Upload your video to Stream group
The tutorial will walk you through creating a group in Office 365 Stream, adding your students to the group, and uploading videos to the group.
Microsoft Stream is an Enterprise Video service to store and streams videos. You can share your videos on Stream with your students and colleagues securely. Stream adds closed captioning to your videos automatically.
1. Go to CUNY Office 365 page and click the "Log into Office 365" link at the bottom of the left menu bar.
2. Log in with your CUNY Login credential.
3. Click Stream.
4. On the Stream page, click "My content" and then choose Groups.

5. On the Groups page, click the plus icon to create/add a group.

6. Type in a name for the group. It is recommended to use your course name and semester as the group name. Ignore the email address field as our emails are not integrated with Office 365 as of now. The default settings are that only members in the group can view the content, and members can contribute. If you only want to use this group to post your videos, click Edit.

7. Uncheck the box for "Allow members to contribute" and then click Create to create the group.

8. It now asks you to add members. You will need to use students' CUNY Login credentials to add them to your group. Click "Not now" as of now. We'll learn how to get students' CUNY Login credentials first in the next few steps.
9. Go to your course in Brightspace. On the top navbar, click Grades.
10. On the Grades page, click Export.

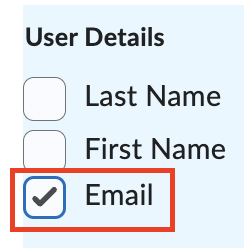
11. On the Export Grades page, scroll down to User Details section and check the box for Email.

12. Click Export to Excel.

13. A pop-up box appears showing a green bar. After preparation of the file is completed, click the Download button. Open your downloaded spreadsheet.
14. Open your downloaded spreadsheet. you will see the Email column filled with students' CUNY Login credentials.
15. Go to your Stream group page.
16. Click Membership, then "Add member."

18. On the pop-up "Add members ..." window, in the text box, copy and paste a student's CUNY Login username obtained from step 14, and then click the search icon. The student's CUNY Login will show up. Select it by clicking on it. You can only add one member at a time. If you cannot find the student to add, open a Y-Connect ticket. The IT help desk will help resolve the issue.

19. Repeat step 18 to add all students. Then click Save to add your students to this group.

20. On your group page, click Videos. Then "Upload Video."

21. A pop-up window appears. Click "Show All Files..." to select your video file.

22. You will see on the top of the pop-up window first the Uploading percentage bar, then the Processing percentage bar moving. While waiting, revise your video name if necessary, and add a description if you wish. During processing, under Thumbnail, you will see some images on the right. Click the one you want to be used as the front image.

23. Click Permission to open the Permission tab. Make sure that a lock is under Viewers and only your intended class groups are listed.

24. Click Options to open the Options tab. Under Captions, make sure to check the box for "Autogenerate captions" so that Stream generates closed captioning for your video. If you have a subtitle file, click "Upload a subtitle file" to upload it. Then click Publish.

25. Repeat steps 20 - 24 to upload more videos if you wish.
26. There are two ways to share your videos with your students. One is to share one video at a time. The other is to share the Stream group video page where students can see all of your videos posted here.
To share one video at a time, go to that specific video page. Under Details, click Share. Copy the URL by pressing Ctrl key and C on a Windows machine, Command key and C on a Mac.

To share the group video page, click Videos on your group page. Highlighting the URL on the address bar at the top and press the Ctrl key and C on a Windows machine, Command key and C on a Mac to copy the URL.

27. Go to your Bb course, on a content page, click "Build Content" > "Web Link." Next, paste the URL (press the Ctrl key and V on Windows, Command key, and V on a Mac) in the URL field. Add a subject title in the Name field. In the Description box, type in your instructions. In your instructions, tell students that, when prompted to log in, they need to use their CUNY Login, e.g. firstname.lastnameXX@login.cuny.edu, to log in and access the video.
Revised: October 21, 2024